Today the fellows came by my place to fight the Battle of Bunker Hill! Kevin took the British while Jon took the Americans.
Kevin started by moving Howe's brigade into a single line. He was hoping to pin Stark's men in their fence position and take the hill with his grenadiers.
Pigot's men approached in column. The British batteries peppered the rebels with long range fire.
Howe's men took enough harassing fire as they approached that all three battalions picked up disruption points.
The British grenadiers started up the long slope, and all three of us were reminded of
Howard Pyle's painting.
"Don't fire until you see the whites of their eyes!" Prescott's men send the grenadiers reeling back down the hill, leaving 60 dead and wounded behind them.
The American skirmishers kept Pigot's brigade from coordinating too closely with Howe.
It was at this point that we had an actual casualty! Jon cut his finger on the steel tape measure. Ouch! I didn't even realize I had a picture of our bloodshed until I looked through my shots.
Kevin made a second attempt on a frontal attack, this time with the 5th and 52nd Foot. One of Pigot's battalions, still in column, took a nasty volley at close range.
With three British battalions routing, Kevin called off the attack. The rebels had held Breed's Hill!
We had a break for lunch and tried the scenario again. This time Kevin held off any attack until Clinton's reinforcing brigade was available. With only nine turns remaining until the end of the scenario, Kevin was gambling that once concentrated blow could clear the Americans off the hill.
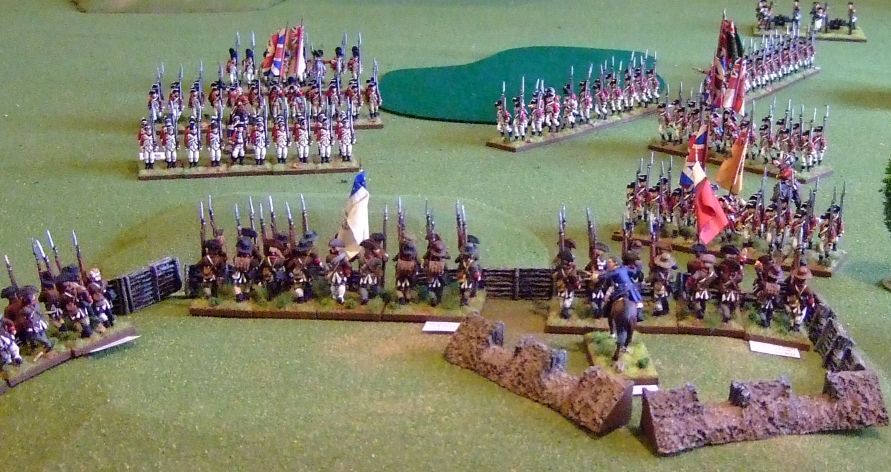
This time seven British battalions would advance as one.
Still only one unit from each brigade can charge at a time. Here Pigot's lead regiment closes on the breastworks. Every time the rebels fired, they rolled unmodified 10s or better. This time is was a double six: two extra casualties on the lead unit and a wounded general.
The British light infantry went in next. Another series of devastating volleys crippled the British attack.
The third time was the charm! The 5th and 52nd Foot gained a foothold on the last game turn. Unfortunately this same turn, two British units failed rally rolls and dispersed. This game too resulted in an American victory.
In two plays of this scenario, we had two resounding American victories, which was not at all what I had expected! I will play this same scenario through solo to see if I can get a different result.
Even if the games were lopsided, a good time was had by all! I'm very lucky to have such a good gaming group. No drama, no hurt feelings, just friendly guys who enjoy history and a good spectacle!


Having gamed Bunker Hill a few times before today, the American success was unexpected. Great fun to see the British turn tail and run but unexpected.
ReplyDeleteVery enjoyable diversion for a Saturday. Thanks for hosting and keeping the troops fed, Scott!
Let's get these AWI collections out on the table more frequently.
Thanks for playing, Jon! Yes, we definitely need to get in more AWI games.
DeleteGreat looking game, Scott. But I am most impressed seeing your huge stash of model kits!
ReplyDeleteThere are plenty more not pictured! Some day I will get back to building some models.
DeleteBeautiful figures, for a wargames army its hard to beat the British in 1768 warrant.
ReplyDeleteI've played the British Grenadier Bunker Hill scenario a number of times, on all of the occasions it was victory for the Continentals. Me, being the British play must have run through every permutation possible to shift the rebels from the hill but never made it, I got close a couple of times though.
I'll try my luck solo and see how I do.
DeleteI think our games ran roughly 3-2 for Americans. It's one of the few scenario's that the Americans win more then lose. Historically the British succeeded only after the Americans ran out of ammo and had no answer to the bayonet so if the Americans can fire all day long then it's a tough slog for the British. Anyhow it's fun scenario that can be played many times. Nice looking game btw Scott.
ReplyDeleteChristopher
I may try limiting the Americans to just a few turns of fire. We'll see how the British do then.
DeleteLooks like great fun.
ReplyDeleteThe figures are stunning!
Thanks, Glenn!
DeleteI enjoyed your play through and pictures, thanks (I came here from Jonathan’s blog). I had wondered how the second game went in gterms of the scenario working, but it looks like the second game was influenced by hot dice, so who knows what a third play will bring :-)
ReplyDeleteBeautiful troops, Scott!
ReplyDeleteFor a St Patrick's Day game, no Irish units?!
Regardless, 2-0 for the rebels!