I have been working on a fairly large commission, painting figures in big lots, so the blog has not been updated much lately. To make up for the infrequent updates, I have included a detailed painting commentary for these figures. I often get emails from readers asking for more painting tutorials (three this week), so I think I will start adding more details of paints used. If I do not name a brand, the paint is Delta Ceramcoat craft acrylic.
So here we go.
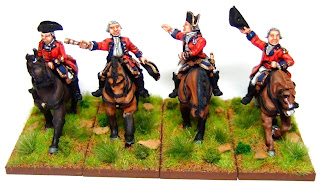
This weekend I took a little break from the commission and painted a handful of figures for myself (and for Jon -- let's get a game going!), these four Old Glory British generals. These are all from AWI-43 "British Personalities." The named figures are Howe, Clinton, Cornwallis, and Burgoyne, but I cannot tell one from the other.
At a guess, I would say we have, from left to right, Cornwallis, Howe, Clinton, and Burgoyne.
I have been making a real effort lately to improve my horses. I bring up images of actual horses and copy the coloring as best I can, mixing my paints when I need to. It slows the painting quite a bit, so I have not been doing that with large units of horsemen, but with mounted generals I do not mind spending a little extra time.
Any gamer fielding a British army will need a good technique for painting red. It is surprising how many other troops also have red bits on their uniforms. For a red coat, I use three tones. For red facings and such, I skip the final highlight and use only two tones.
First I paint the entire area with Barn Red. I used to use Cinnamon, which had a bit more brown to it, but Delta discontinued the color a couple of years ago. I then apply a straight Red paint to most of the area, leaving the Barn Red showing in shaded areas and at the edges of red areas. I have found some good reds in the Delta line, but my last few bottles have not covered well. Instead I have been using Vallejo's Flat Red. It dries with a slight sheen, but the sealant will dull it down. I then apply an extremely sparing highlight of pink, which I mix myself from Vallejo's Flat Red and Delta's Oyster White.
This pink highlight can easily be overdone. I try to hit only the very highest areas, like shoulders, elbows, and tails, and to hit them very lightly. If it's done right, you should never see the pink.
I used my standard three tone flesh treatment. I start with an all-over coat of Cayenne, then paint most of the skin in Medium Flesh, leaving the Cayenne visible only in the natural shadows. I finish by very sparingly picking out highlights with Fleshtone.
I have a pretty standard set of colors for dark blue. I use it on Napoleonic French, Civil War Union, and pretty much any time I need a rich dark blue. I paint the whole area with Prussian Blue, then paint over most of the area with Blueberry, leaving the Prussian Blue visible in shadows and along borders.
I have never found a good acrylic paint for gold. Instead I use a combination of acrylic and enamel paint. I start by painting the gold areas with Delta Ceramcoat's Brown Iron Oxide, which is one of the most useful colors in my paint box. I then use Testors Gold, leaving the brown in the shaded areas. The Testors I use is the super cheap paint in the little square bottles. I don't like the fumes, and it's a pain to have to keep a separate set of brushes for enamel paints, but nothing else gives as good a result.
I always seal my figures with Testors Dullcote from a rattle can. Because it is an enamel paint, it can cause the enamel gold paint to run. To keep this from happening, I use my airbrush to give the figures a light coat of clear acrylic paint before sealing. If you don't like the idea of using an airbrush, you could paint a thin layer of any clear acrylic paint over the gold.
Any 18th or 19th century soldier is going to have a lot of white in his uniform or equipment. I have a standard set of colors that I use for whites, and I am very happy with the way it looks. The white on my figures always seems to "pop," so much so that many people have been convinced that I prime white. I actually prime black, but by building up to white, I am able to get a vibrant tone.
I start with Mudstone, which is a very light brownish grey. My main tone is NOT straight white, which usually looks too harsh. Instead I use Oyster White, which has just a touch of cream in it. I find that off whites have better pigment and look better than a pure white.
I thought all my British officers should be wearing powdered wigs. This is a simple drybrush of Oyster White over Rain Grey.
Any natural leather work, as on this officer's holster, gets a base of Brown Iron Oxide and a main tone of Autumn Brown.
I had these figures sitting in my "to paint" box for five years. I was not impressed with the bare castings. As I have been trying over the past couple of years to paint what I have rather than buying more, so I thought I would give these generals a try.
I am glad I did. They may lack the elegance of Perry, and they certainly are not as beautiful as Fife and Drum, but they should look very nice on the table. Each figure is unique enough to stand out as an individual.


Beautiful work Scott!
ReplyDeleteLooks great, nice clean work.
ReplyDeleteGreat looking generals, very nice work!
ReplyDeletePhil.
Very handsome officers. For officer basing, I opted for round vs rectangular. Shouldn't make a difference in game play. Do you agree?
ReplyDeleteYes, I agree Jon. We can measure from their noggins.
ReplyDeleteGreat stuff, I have always liked the redcoats but you do them serious honour sir!
ReplyDeleteNicely done Scott! This makes me want to move the Fife & Drum personalities up in the queue. :)
ReplyDelete